ActionMailer 使い方
- いきなりメール設定をしていく(今回はgmailを扱う前提)
config/environments/development.rb
  config.action_mailer.raise_delivery_errors = true ← メールでエラーが出た時にログを出してくれる
  host = 'localhost:3000'
  config.action_mailer.default_url_options = { host: host}
  #mail設定

  config.action_mailer.delivery_method = :smtp
  config.action_mailer.smtp_settings = {
    address: 'smtp.gmail.com',
    port: 587,
    domain: 'gmail.com',
    user_name: 'hogehoge@gmail.com',     ←gmailにログインする時のアドレス
    password: 'gmailのpassword',
    authentication: 'plain',
    enable_starttls_auto: true
  }
2
ActionMailerクラスを生成する
$ rails g mailer notice_mailer send_event_participation(←メソッド) で以下のファイルができるのでそれぞれいじっていく
app/mailers/notice_mailer.rb app/mailers/application_mailer.rb app/views/notice_mailer/send_event_participation.html.slim app/views/notice_mailer/send_event_participation.text.slim spec/mailers/notice_mailer_spec.rb
spec/fixtures/message/send_event_participation
spec/mailers/previews/notice_mailer_preview.rb
3. メールの共通設定をするapplication_mailer.rbをいじる
class ApplicationMailer < ActionMailer::Base# 全メーラーの共通設定
  default from: "noreply@example.com",
          bcc:      "sample+sent@example.com",
          reply_to: "sample+reply@example.com"
  #####layout 'mailer'  ← template errorが出たりしたらコメントアウトしてください
end
4. notice_mailer.rbをいじる
class NoticeMailer < ApplicationMailer
  #イベントに参加した時に詳細をメールで送信する

  def send_event_participation(user, reservation)
    @user = user
    @event = Event.find(reservation.event_id).title
    mail to: user.email,
         subject: 'イベントに参加しました!'
  end
end
5. コントローラー側にメールを送信するタイミングを記述 reservation_controller.rbのcreateメソッドで使います(イベント予約の受付をメールで確認するイメージ)一例
def create
    reservation = Reservation.find_or_initialize_by(user_id: current_user.id, event_id: params[:id])
    if reservation.save
      NoticeMailer.send_event_participation(current_user, reservation).deliver_now #メール送信部
      redirect_to event_path(params[:id]), :flash => { :success => '参加予約完了しました!'}
    else
      flash.now[:error] = 'すでに参加済みです'
      redirect_to event_path(params[:id])
    end
  end
6.メソッド名に関連したsend_event_participation.html.slimにメールの内容を書く
p #{ @user.name }さんこんにちは!
p #{ @event }のイベントに参加受付を完了しました。
これで送信受信が正常にできるはず!!!!!!!
本番環境でのメール送信
上記の設定のままheroku環境でメールを送信したところ見事にエラー発生... 当たり前だが本番用の設定をする必要がある。 production環境からメール送信するために、「SendGrid」を使用する。
$ heroku addons:create sendgrid:starter ← アドオンをアプリに追加する
続いて、config/environments/production.rb内を設定していく
config.action_mailer.raise_delivery_errors = true
  config.action_mailer.delivery_method = :smtp
  host = '[herokuのサブドメインを入力].herokuapp.com'
  config.action_mailer.default_url_options = { host: host }
  ActionMailer::Base.smtp_settings = {
    :address => 'smtp.sendgrid.net',
    :port => '587',
    :authentication => :plain,
    :user_name => ENV['SENDGRID_USERNAME'],
    :password => ENV['SENDGRID_PASSWORD'],
    :domain => 'heroku.com',
    :enable_starttls_auto => true
  }
$ heroku config で環境変数を確認し SENDGRID_USERNAMEとSENDGRID_PASSWORDが設定されていることを確認。
$ git add -A
$ git commit -m "メール本番環境設定"
$ git push origin master
$ git push heroku master
$ heroku run rake db:migrate
でおk!!!!
CarrierWave の使い方 by チュートリアル11章
CarrierWaveとは画像をアップロードや画像リサイズができるgemのこと
早速実装方法を解説します。
1. gemfileに
gem 'carrierwave' #アップローダー
gem 'mini_magick'#リサイズ機能
gem 'fog'#本番環境に画像をアップする
を追加。
2. $ bundle install
3. $ rails g uploader Picture #pictureモデルのアップローダーを生成
4. $ rails g migration add_picture_to_microposts picture:string #micropostモデルにpictureカラムを追加
5. $ rake db:migrate
6. models/micropost.rbに
mount_uploader :picture, PictureUploader
と一行書き足す。mount_uploaderはメソッドで、赤字部分はアップローダーのクラス名を指していることに注意 。
7. viewにアップロードフォームをさくせいする
_micropost_form.html.erb
(ハイライト部分が書き足したコード)
<%= form_for(@micropost, html: { multipart: true }) do |f| %>
  <%= render 'shared/error_messages', object: f.object %>
  <div class="field">
    <%= f.text_area :content, placeholder: "Compose new micropost..." %>
  </div>
  <%= f.submit "Post", class: "btn btn-primary" %>
  <span class="picture">
    <%= f.file_field :picture %>
  </span>
<% end %>
html: { multipart: true } はファイルをアップロードする際に必要なオプションです
8. app/controllers/microposts_controller.rb内の
strongparamsに:pictureを追加
params.require(:micropost).permit(:content, :picture)
9. app/views/microposts/_micropost.html.erb
マイクロポストの画像表示をするために一行追加
picture? はbooleanを返してくれる。trueなら画像を表示してくれる
ここまでで画像投稿と表示はできるようになります。ここから下は画像のリサイズをしていきます。
10. app/uploaders/picture_uploader.rbにバリデーション
 def extension_white_list
    %w(jpg jpeg gif png)    #これらの拡張子のみ表示できる
  end
11. app/models/micropost.rb 内で画像サイズのバリデーション
(ハイライト部分を新たに記述すること)
class Micropost < ActiveRecord::Base
  belongs_to :user
  default_scope -> { order(created_at: :desc) }
  mount_uploader :picture, PictureUploader
  validates :user_id, presence: true
  validates :content, presence: true, length: { maximum: 140 }
  validate  :picture_size

  private

    # アップロード画像のサイズを検証する
    def picture_size
      if picture.size > 5.megabytes
        errors.add(:picture, "should be less than 5MB")
      end
    end
end
12. ファイルサイズをJqueryで確認
app/views/shared/_micropost_form.html.erb
(ハイライト部分が追加したもの)
<%= form_for(@micropost, html: { multipart: true }) do |f| %>
  <%= render 'shared/error_messages', object: f.object %>
  <div class="field">
    <%= f.text_area :content, placeholder: "Compose new micropost..." %>
  </div>
  <%= f.submit "Post", class: "btn btn-primary" %>
  <span class="picture">
    <%= f.file_field :picture, accept: 'image/jpeg,image/gif,image/png' %>
  </span>
<% end %>

<script type="text/javascript">
  $('#micropost_picture').bind('change', function() {
    var size_in_megabytes = this.files[0].size/1024/1024;
    if (size_in_megabytes > 5) {
      alert('Maximum file size is 5MB. Please choose a smaller file.');
    }
  });
</script>
バリデーションが完成しました。
13. 画像のリサイズ
まずリサイズするために必要なimagemagickをインストールしていく
$ sudo apt-get update
$ sudo apt-get install imagemagick --fix-missing
macユーザーはapt-getが使えないことがあるので、そうなったらapt-getをbrewに変更してみてください。
14. リサイズするためにアップローダーを修正する
class PictureUploader < CarrierWave::Uploader::Base

  include CarrierWave::MiniMagick
  process resize_to_limit: [400, 400]
400のところは任意で設定できます。
ここまででアップロードと画像のリサイズを実装できました!!拍手!!!
本番環境でのアップロード(fog)に関しては後日追加していきます。
最近覚えたものを忘れないように大変雑にまとめていく
#テスト
assert系 → 予期した結果
refute系 → 「〜にならないこと」
#FakerでDB上にサンプルUserを生成する
99.times do |n|
name = Faker::Name.name
email = "example-#{n+1}@rails.jp"
password = "password"
User.create!(
name: name,
email: email,
password: password,
password_confirmation: password
)
end
$rake db:migrate:reset
$rake db:seed
でおk。
#toggle!メソッド
user.toggle!(:admin)
→ admin属性の状態をfalseからtrueにする
#
if !user_signed_in?は
unless user_signed_in?
if not user_signed_in? (推奨されていないらしい)
とも書ける
#
'aria-haspopup' => 'true', 'aria-expanded' => 'false'は
aria: { haspopup: true, expanded: false}
と代替できる。(後者の方がスッキリする)
条件式 ? 真の値 : 偽の値
以下と同義
if @user.nil?
真の値
else
偽の値
end
# sessionのフォーム
= form_for(:session, url: login_path) do |f|
sessionはインスタンスを持たないため、リソースとそれに対応するURLを指定する
#クッキーとは情報を保存するもの
#sessionとは接続〜切断までの一連の流れ
ログインをnewとcreate
ログアウトはdestroyを用いている
#password_digestとは
ユーザの入力したpasswordをそのまま保存するのは危険! ので、passwordを暗号化するもの
migrationファイルの例
def change
add_column :users, :password_digest, :string
end
# DBでmysqlを扱う方法
$ rails new sample_app -d mysql
gem に mysql追加(version指定しないとほぼ落ちる)
$ rake db:create
$ rake db:migrate
これでおk。
$ rails db
> show tables;
> select * from users;
> desc users;
> exit
みたいな感じ
#git でsshのキーチェーンの設定方法
赤文字がキーチェーンとなる
clone などする際には
$ git clone git@github.com:example/example.git
とする。(:の前までがキーチェーンの範囲)
#メタプログラミング(黒魔術)とは
”Rubyの最大の特徴で、簡単に言うとコードを生成するコードのこと”(かなり奥が深いらしい、抽象的な記法を使ってコードを書くことにより動的にコードを生成する。)
一見コードをみただけでは何を書いてるのかわからないもの、ターミナル上で引数などを指定し、実行されるまで何が出力されるかわからないもの。
#低レベルな知識
コンピューターに近いものの知識らしい(Linuxなど)、高レベルな知識は人間に近いものらしい。低レベルな知識によって技術者の差が出る。
- ファイルや標準入力から正規表現でマッチする行を探し出すコマンド
- ログファイルの中から特定のログを探し出したり、ソースコードのあるディレクトリで特定のクラス、メソドなどを定義、呼び出しているところを探したりいろいろな目的で使う.
ex) grep "sample" sample.txt
=> sample
# 複合キー
複数項目で1セットな主キー
gem ' composite_primary_keys '
例)reservationsに複合キーを持たせる(user_idとevent_idで)
reservationのmigrationファイル
def change
create_table :reservations, id: false do |t|
t.integer :user_id
t.integer :event_id
t.timestamps null: false
end
execute 'ALTER TABLE reservations ADD PRIMARY KEY (user_id, event_id);'
end
その後
$ rake db:migrate(ここで結構エラー出ます、大体がmigrationファイルでだぶってたりするのが原因なので削除したりして作り直したりしました。)
mysql> desc reservations;
+------------+----------+------+-----+---------+-------+
| Field | Type | Null | Key | Default | Extra |
+------------+----------+------+-----+---------+-------+
| user_id | int(11) | NO | PRI | NULL | |
| event_id | int(11) | NO | PRI | NULL | |
| created_at | datetime | NO | | NULL | |
| updated_at | datetime | NO | | NULL | |
+------------+----------+------+-----+---------+-------+
のようにuser_idとevent_idの2つがprimary keyとなる
参考
シンタックスシュガーについて
備忘録 ||=
チュートリアル8章に登場する以下の文法を完全に理解しようという記事です。
def current_user
@current_user ||= User.find_by(id: session[:user_id])
end
#Userオブジェクトそのものの論理値は常にtrueになることです。そのおかげで、@current_userに何も代入されていないとき(nilの時)だけfind_by呼び出しが実行され、無駄なデータベース読み出しが行われなくなります
#。Rubyでは、nilとfalseを除いて、あらゆるオブジェクトの論理値がtrueになるように設計されています。さらにRubyでは、||演算子をいくつも連続して式の中で使用する場合、項を左から順に評価し、最初にtrueになった時点で処理を終えるように設計されています
||= を徹底的に理解する。
この「||=」(or equals) という代入演算子はRubyで広く使用されているイディオムであり、先輩に使いまくるから絶対理解しろって言われた、、、
多くのコンピュータプログラムでは、以下のような記法で変数の値を1つ増やすことができます。
x = x + 1
x += 1 のように短縮形が使える
例 $ rails console
>> x = 1
=> 1
>> x += 1
=> 2
>> x *= 3
=> 6
いずれの場合も、●という演算子があるときの「x = x ● y」と「x ●= y」の動作は同じです。
Rubyでは、「変数の値がnilなら変数に代入するが、nilでなければ代入しない (変数の値を変えない)」という操作が非常によく使われます。or演算子||を使用すれば、以下のように書くことができます。
>> @foo
=> nil
>> @foo = @foo || "bar"
=> "bar"
>> @foo = @foo || "baz"
=> "bar"
nilの論理値はfalseになるので、@fooへの最初の代入「nil || "bar"」の評価値は"bar"になります。同様に、2つ目の代入「@foo || "baz"」("bar" || "baz"など) の評価値は"bar"になります。Rubyでは、nilとfalseを除いて、あらゆるオブジェクトの論理値がtrueになるように設計されています。さらにRubyでは、||演算子をいくつも連続して式の中で使用する場合、項を左から順に評価し、最初にtrueになった時点で処理を終えるように設計されている。
上記の演算子をコンソールセッション上で実際に実行して比較してみると、@foo = @foo || "bar"はx = x O yに該当し、Oが||に置き換わっただけであることがわかります。
x = x + 1 -> x += 1
x = x * 3 -> x *= 3
x = x - 8 -> x -= 8
x = x / 2 -> x /= 2
@foo = @foo || "bar" -> @foo ||= "bar"
これで、「@foo = @foo || "bar"」は「@foo ||= "bar"」と完全に等しいことがわかる。
この記法を現在のユーザーのコンテキストで使用すると以下のように簡潔なコードで表現できるようになります。
@current_user ||= User.find_by(id: session[:user_id])
なるほど!!
おk!!!
正規表現、オブジェクト、変数、定数
ruby で文字列を処理するときには正規表現(Regular Expression)というものが使われる。
正規表現を使うと
- 文字列とパターンの一致(マッチング)
- パターンを使った文字列の切り出し
を簡単に行える。
正規表現と文字列のマッチングを行うには
/パターン/ = ~マッチングしたい文字列
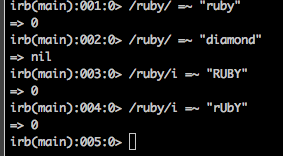
マッチングが成功したときはマッチした部分の位置を返します。文字の位置は配列のインデックスと同様に0から数えます。つまり、先頭の文字の位置は0と表される。
失敗したときはnilが返される。
ーーーーーーーーーーーーーーーーーーーーーー
別のファイルを取り込む
ライブラリを読むこむためにはrequireメソッドを使用
require 使いたいファイル名
require "hello.rb"
と記述(.rbは省略可能)
ーーーーーーーーーーーーーーーーーーーーーーー
オブジェクト(インスタンス)
rubyのデータを表現する基本的な単位のこと
数値オブジェクト: 1, -10, 3.14.15
文字列オブ: ”こんにちは”、"hello"
配列、ハッシュオブジェクト:複数のデータをまとめるためのオブジェクト
あやふやだったので概念をしっかり定着させなくては!
第4章 ruby 文法
以前の記事にも4章の文法について記しましたが、今回は未だにあやふやなとこをまとめます。
まずメソッド定義について
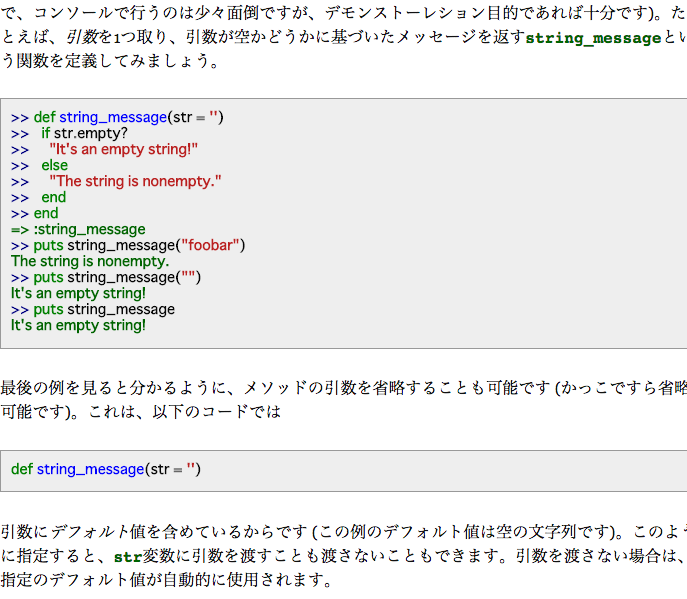
「rubyの関数には暗黙の戻り値がある」、関数内で最後に評価された式の値が自動的に返されることの意味。(関数で戻り値を明示的に指定しなかった場合)
使えそうなメソッド
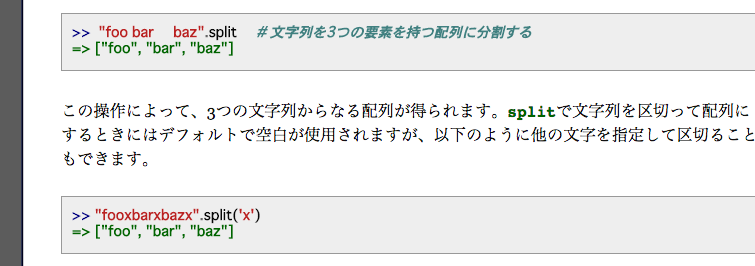
splitの反対 .join メソッド

これも便利そう!
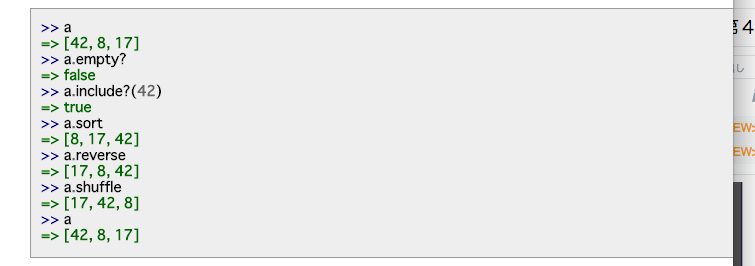
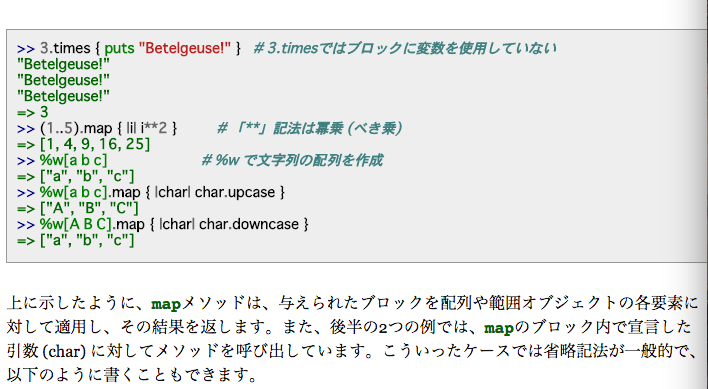
ブロック => rubyの極めて強力な機能
do ~ endで終わるもの
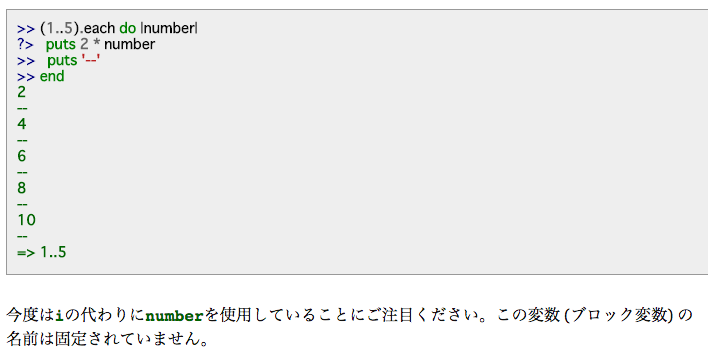
ブロックは奥が深いらしく、十分に理解するには経験が必要。mapメソッド(与えられたブロックを配列や範囲オブジェクトの各要素に対して適用し結果を返してくれるもの)を用いた例文

シンボル =>「余分なものをそぎ落とした軽量な文字列」
"name" == :name #ここ超重要!!
user["name"] == user[:name]
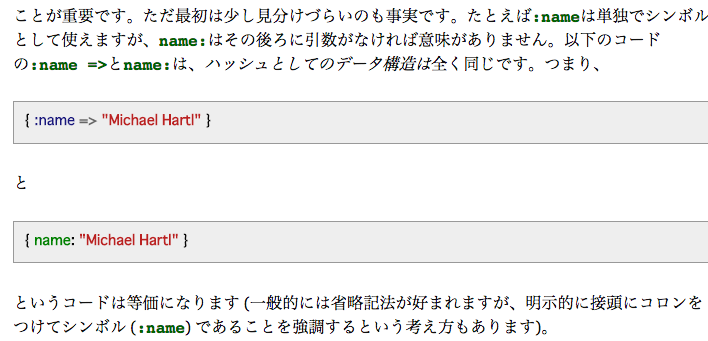
シンボルやっとモヤモヤがとけましたあああああ!
コード読みやすくなること間違いなし!!
この勢いでどんどん突き進む!
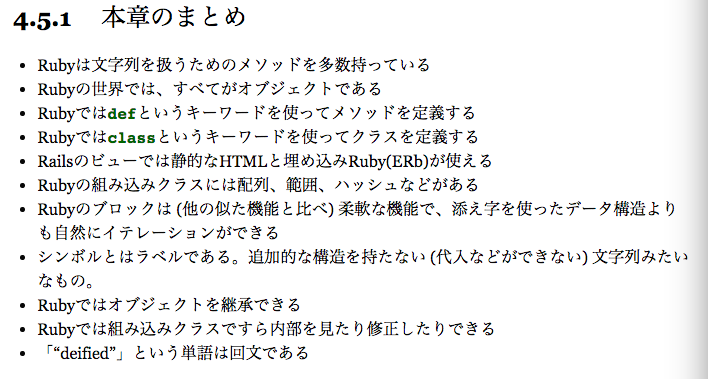
以上!
8割は理解したはず!!
bootstrap 使い方 レシピ集 まとめ!かなり長いです。。。
最近はクソアプリが形になってきたのですが今の時代、人に使ってもらうためにはデザインの方がむしろ重要なのではと思い、とりあえずbootstrapを学んでいきます。
<!-- Latest compiled and minified CSS -->
<link rel="stylesheet" href="https://maxcdn.bootstrapcdn.com/bootstrap/3.3.5/css/bootstrap.min.css">

<!-- Optional theme -->
<link rel="stylesheet" href="https://maxcdn.bootstrapcdn.com/bootstrap/3.3.5/css/bootstrap-theme.min.css">

<!-- Latest compiled and minified JavaScript -->
<script src="https://maxcdn.bootstrapcdn.com/bootstrap/3.3.5/js/bootstrap.min.js"></script>

↑これらをapplication.html.erbのhead内にコピーする


<%= yield %>を <div class ="container">で囲む!
container 内に<%= render 'layouts/header' %>記述

例)_header.html.erbにnavbarを埋め込む方法

<nav class="navbar navbar-default">
 <div class="container-fluid">
 <div class="navbar-header">
 <a class="navbar-brand" href="#">
 <img alt="Brand" src="...">
 </a>
 </div>
 </div>
</nav>

railsではこんな感じで使う!=>いろんなパターンがあるらしいので調べてみる

ーーーーーーーーーーーーーーーーーーーーーーーーーーーーーーーーーーーーーーーーーーーーー
各単語の意味

<div class="container">
 <div class="row">
 <div class="col-sm-3" style = "background:gray;">side1</div>
 <div class="col-sm-6 col-xs-6" style = "background:green;">main</div>
 <div class="col-sm-3 col-xs-6" style ="background:gray;">side2</div>
 </div>
</div>
gridといわれるもので
デバイスに対応したレスポンシブな表示が可能
12分割で表す
スペースで複数指定できる
真ん中のsmやxsっていうのは各デバイスの基準のようなもの EX))スマホでレスポンシブ表示したいならxsを用いるなど。。=>詳細は
CSS · Bootstrap grid optionsを参照
ーーーーーーーーーーーーーーーーーーーーーーーーーーーーーーーーーーーーーーーーーーーーーテーブルを簡単に作れる編
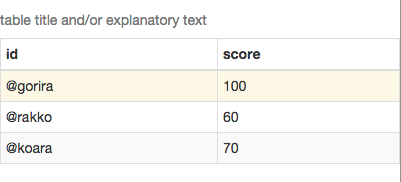
<div class = "container" style ="padding: 20px 0">
<table class = "table table-striped table-bordered table-hover table-condensed">
<caption>table title and/or explanatory text</caption>
<thead>
<tr>
<th>id</th><th>score</th>
</tr>
</thead>
<tbody>
<tr class = "warning">
<td >@gorira</td><td>100</td>
</tr>
<tr>
<td>@rakko</td><td>60</td>
</tr>
<tr>
<td>@koara</td><td>70</td>
</tr>
</tbody>
</table>
</div>
赤文字のとこに注目
classに使いたいものを連ねて記述するだけ!!
ちょーーーーべんり!!!!!
今までの苦労はなんだ!!
ーーーーーーーーーーーーーーーーーーーーーーーーーーーーーーーーーーーーーーーーーーーーー

form関連

<div class="container" style ="padding:20px 0">

 <form class ="form-horizonal" style = "margin-bottom:15px;">
 <div class="form-group" >
 <label class ="sr-only-control-label" for = "email">email</label>
 <input type ="text" id = "email" class ="form-control" placeholder ="email">
 <span class ="help-block">error!!</span>
 </div>
 <div class="form-group">
 <input type ="submit" value ="submit" class ="btn btn-primary">
 </div>
 </form>
</div>
-----------------------------------------------------------------------------------------------
glyphiconアイコンの使いかた

<div class="container" style ="padding:20px 0">
<p><i class = "glyphicon glyphicon-book"></i>book</p>
<button class="btn btn-primary">push me!</button>
<button class="btn btn-success"><i class = "glyphicon glyphicon-book"></i>bookpush me!</button>
<button class="btn btn-danger">push me!</button>
<button class="btn btn-warning">push me!</button>
</div>
-----------------------------------------------------------------------------------------------
ドロップダウンメニューの使い方
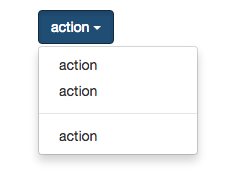
<div class="container" style ="padding:20px 0">
<div class ="btn-group">
<button class="btn btn-primary dropdown-toggle" data-toggle="dropdown">
action <span class ="caret"></span> <--右の逆三角形
</button>
<ul class ="dropdown-menu">
<li><a href="">action</a></li>
<li><a href="">action</a></li>
<li class ="divider"></li> <---ドロップダウンメニューないで横線をつける
<li><a href="">action</a></li>
</ul>
</div>
</div>
ーーーーーーーーーーーーーーーーーーーーーーーーーーーーーーーーーーーーーーーーーーーーーナビゲーション関連
最上部 breadcrumb
真ん中 pagination
最下部 pager
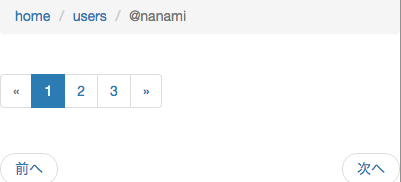
最上部
<div class ="container" style = "padding:20px 0">
<ul class = "breadcrumb">
<li><a href="">home</a></li>
<li><a href="">users</a></li>
<li class = "active">@nanami</li>
</ul>
真ん中
<ul class ="pagination">
<li class ="disabled"><a href ="">«</a></li>
<li class ="active"><a href ="">1</a></li>
<li><a href ="">2</a></li>
<li><a href ="">3</a></li>
<li><a href ="">»</a></li>
</ul>
最下
<ul class ="pager">
<li class ="previous"><a href ="">前へ</a></li>
<li class="next"><a href ="">次へ</a></li>
</ul>
</div>
ーーーーーーーーーーーーーーーーーーーーーーーーーーーーーーーーーーーーーーーーーーーーーnavbar
↓
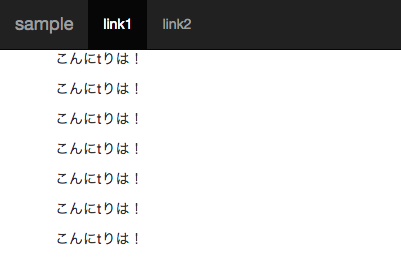
横に縮小させていくと。。。
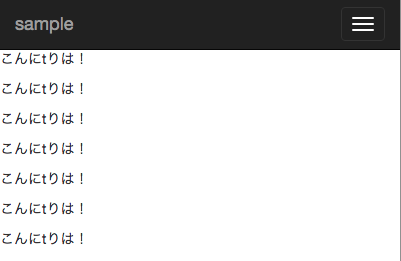
スマホ対応になる!べんり!
 <nav class ="navbar navbar-inverse navbar-fixed-top">
 <div class="navbar-header">
 <button class="navbar-toggle" data-toggle="collapse" data-target=".target">
 <span class="icon-bar"></span>
 <span class="icon-bar"></span>
 <span class="icon-bar"></span>
 </button>
 <a class ="navbar-brand" href ="">sample</a>
 </div>
<div class ="collapse navbar-collapse target">
 <ul class =" nav navbar-nav">
 <li class ="active"><a href ="">link1</a></li>
 <li><a href ="">link2</a></li>
 </ul>
 <ul class =" nav navbar-nav navbar-right">
 <li><a href ="">link3</a></li>
 </ul>
 </div>
 </nav>
navbar-fixed-topでheaderをスクロールしていっても上部に固定できる
activeは今いるとこを示してくれる
navbar-brandはかっこいいスタイルになる
ーーーーーーーーーーーーーーーーーーーーーーーーーーーーーーーーーーーーーーーーーーーーー

alert系各種 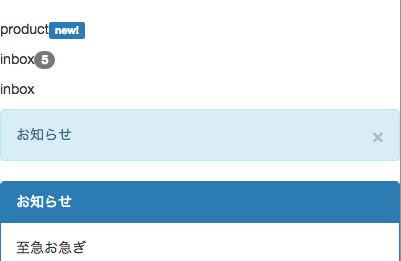
<div class ="container" style = "padding:20px 0">
<p>product<span class ="label label-primary" >new!</span></p>
<p>inbox<span class ="badge">5</span></p>
<p>inbox<span class ="badge"></span></p>
<div class="alert alert-info">
<button class ="close" data-dismiss="alert">×</button> お知らせ</div>
<div class="panel panel-primary ">
<div class="panel-heading">
お知らせ
</div>
<div class="panel-body">
至急お急ぎ
</div>
</div>
</div>
ーーーーーーーーーーーーーーーーーーーーーーーーーーーーーーーーーーーーーーーーーーーーー


続きましてprogressbar
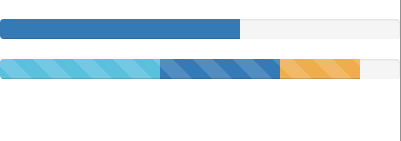
<div class ="container" style = "padding:20px 0">
<div class ="progress">
<div class ="progress-bar progress-bar-primary" style ="width:60%"></div>
</div>
<div class ="progress progress-striped active">
<div class ="progress-bar progress-bar-info" style ="width:40%"></div>
<div class ="progress-bar progress-bar-primary" style ="width:30%"></div>
<div class ="progress-bar progress-bar-warning" style ="width:20%"></div>
</div>
</div>
ーーーーーーーーーーーーーーーーーーーーーーーーーーーーーーーーーーーーーーーーーーーーー


modal=>これは頻繁に使いそう!!

押すと。。。
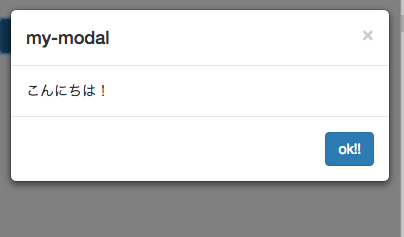
このように表示される!
<div class ="container" style = "padding:20px 0">
<a data-toggle="modal" href ="#mymodal" class ="btn btn-primary">show me!</a>
<div class="modal fade" id ="mymodal">
<div class="modal-dialog">
<div class="modal-content">
<div class="modal-header">
<button class ="close" data-dismiss ="modal">×</button>
<h4 class ="modal-title">my-modal</h4>
</div>
<div class="modal-body"> こんにちは!
</div>
<div class="modal-footer">
<button class="btn btn-primary">ok!!</button>
</div>
</div>
</div>
</div>
</div>
なかなかclassが多かったりするけど使えそう!
ーーーーーーーーーーーーーーーーーーーーーーーーーーーーーーーーーーーーーーーーーーーーーtabの切り替え
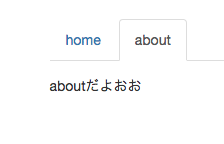
<div class ="container" style = "padding:20px 0">
<ul class ="nav nav-tabs" style ="margin-bottom:15px;">
<li class ="active"><a href ="#home" data-toggle ="tab">home</a></li>
<li><a href ="#about" data-toggle ="tab">about</a></li>
</ul>
<div class="tab-content">
<div class="tab-pane active" id ="home">homeだよおお</div>
<div class="tab-pane" id ="about">aboutだよおお</div>
</div>
</div>
ーーーーーーーーーーーーーーーーーーーーーーーーーーーーーーーーーーーーーーーーーーーーー

tooltipとpopover機能
今回はjsも触ります!
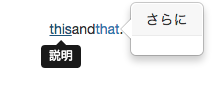
 <div class ="container" style = "padding:20px 0">
 <p><a href ="#" data-toggle ="tooltip" title ="説明">this</a>and<a href ="#" data-toggle="popover" title ="説明" data-content ="さらに説明" >that</a>.</p>
 </div>
 <script src="https://ajax.googleapis.com/ajax/libs/jquery/1.11.3/jquery.min.js"></script>
 <script src="js/bootstrap.min.js"></script>
<script>
$(function() {
 $("[data-toggle=tooltip]").tooltip({placement: 'bottom'});
 $("[data-toggle=popover]").popover();
});
 </script>
ーーーーーーーーーーーーーーーーーーーーーーーーーーーーーーーーーーーーーーーーーーーーー


ラスト!!!画像切り替え!
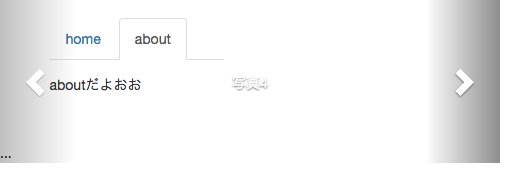
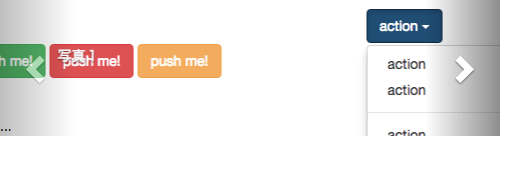
よくありますよねスライドぽくなります。
かなり長いのですが、bootstrap内のcarouselにテンプレがあるのでそちらも参照すると良いです。
<div id="carousel-example-generic" class="carousel slide" data-ride="carousel" style="width:500px">
<!-- Indicators -->
<ol class="carousel-indicators">
<li data-target="#carousel-example-generic" data-slide-to="0" class="active"></li>
<li data-target="#carousel-example-generic" data-slide-to="1"></li>
<li data-target="#carousel-example-generic" data-slide-to="2"></li>
<li data-target="#carousel-example-generic" data-slide-to="3"></li>
</ol>
<!-- Wrapper for slides -->
<div class="carousel-inner" role="listbox">
<div class="item active">
<img src="img/151020-0001.png" alt="photo1">
<div class="carousel-caption">
写真1
</div>
</div>
<div class="item">
<img src="img/151020-0003.png" alt="photo2">
<div class="carousel-caption">
写真2
</div>
</div>
<div class="item">
<img src="img/151020-0001.png" alt="photo3">
<div class="carousel-caption">
写真3
</div>
</div> <div class="item">
<img src="img/151020-0013.png" alt="photo4">
<div class="carousel-caption">
写真4
</div>
</div>
</div>
<!-- Controls -->
<a class="left carousel-control" href="#carousel-example-generic" role="button" data-slide="prev">
<span class="glyphicon glyphicon-chevron-left" aria-hidden="true"></span>
<span class="sr-only">Previous</span>
</a>
<a class="right carousel-control" href="#carousel-example-generic" role="button" data-slide="next">
<span class="glyphicon glyphicon-chevron-right" aria-hidden="true"></span>
<span class="sr-only">Next</span>
</a>
</div>
これも簡単にできます!

以上です!!!!